Yellowstone Map Explained (Upper vs Lower Loop + How to Plan)
This post may contain affiliate links. If you purchase or book through them, I may earn a small commission at no extra cost to you. I only recommend travel tools, lodging, and planning resources that genuinely help make Yellowstone easier to navigate.
Table of Contents
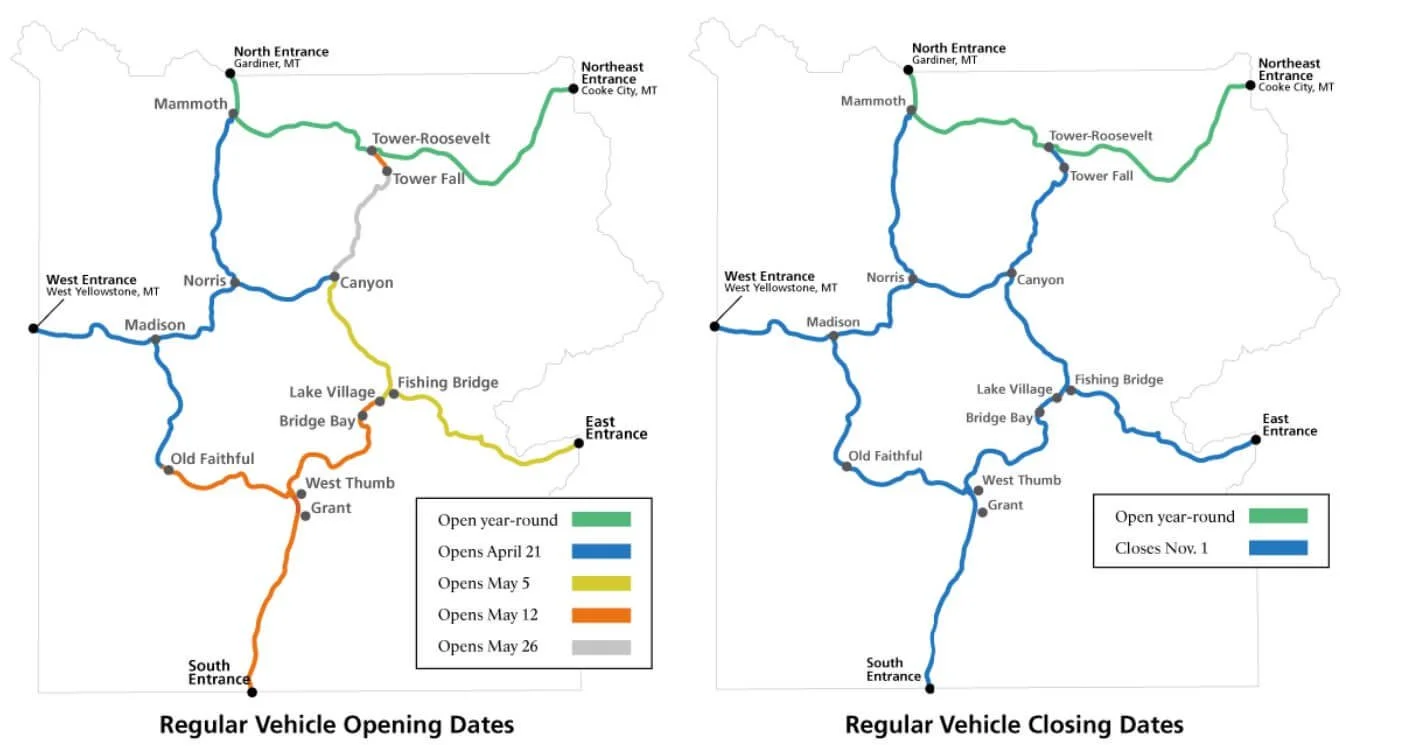
The Yellowstone National Park map looks surprisingly simple at first. Most of the park’s major attractions are connected by the Grand Loop Road, which forms a rough figure eight through the park.
The problem is scale.
Attractions that appear close together can require much more driving than first-time visitors expect, and wildlife jams, construction, parking, and scenic stops can add considerably more time.
The easiest way to understand the Yellowstone map is to stop thinking of the park as one enormous sightseeing list. Instead, divide it into geographic regions and build each day around attractions that naturally fit together.
This guide explains Yellowstone’s Upper and Lower Loops, the major areas you need to recognize on the map, and how to use that geography to build a realistic itinerary without unnecessary backtracking.
Quick Answer
Yellowstone’s main road system is the Grand Loop Road, a roughly figure-eight-shaped route connecting most of the park’s major developed areas and attractions.
The Lower Loop includes many of Yellowstone’s most famous geothermal and scenic areas, including Old Faithful, Grand Prismatic Spring, Yellowstone Lake, and the Grand Canyon of the Yellowstone.
The Upper Loop connects areas including Mammoth Hot Springs, Tower-Roosevelt, and the northern portion of the park. Lamar Valley extends east from the Tower-Roosevelt area toward the Northeast Entrance, so it isn’t simply another stop directly on the Upper Loop.
The most important planning rule: group attractions geographically rather than driving back and forth across Yellowstone.
You don’t necessarily need to drive an entire loop each day. In fact, breaking Yellowstone into smaller regions often creates a better itinerary.
Planning your route? If you want a place to organize your Yellowstone routes, lodging, reservations, and daily itinerary, the Yellowstone Travel Planning System walks you through the entire trip-planning process.
Yellowstone Loop Overview
| Area | Best For | Major Stops |
|---|---|---|
| Southwest / Lower Loop | Geothermal features | Old Faithful, Upper Geyser Basin, Grand Prismatic |
| Canyon Area | Waterfalls + viewpoints | Grand Canyon of the Yellowstone, Upper & Lower Falls |
| Lake / Hayden Area | Scenery + wildlife | Yellowstone Lake, Hayden Valley |
| North / Upper Loop | Terraces + scenic driving | Mammoth Hot Springs, Tower-Roosevelt |
| Northeast | Wildlife | Lamar Valley |
| West Side | Geysers + easy West Entrance access | Madison, Norris, geyser basins |
How Big Yellowstone Really Is

Yellowstone covers more than 2.2 million acres, and the road system stretches across an enormous landscape.
That’s why distances on the map can be deceptive. A route that appears straightforward may include slow traffic, wildlife jams, road construction, parking delays, or scenic stops that turn a simple drive into a significant part of your day.
Don’t build a Yellowstone itinerary using driving time alone. Build in additional time for stopping, parking, wildlife, and the unexpected.
This is also why grouping nearby attractions matters more than trying to maximize the number of stops you can fit into one day.
If you’re trying to estimate how much you can realistically cover, read my Yellowstone Driving Times and How Many Days in Yellowstone guides next.
Upper Loop vs Lower Loop
Lower Loop — Best for Yellowstone’s Most Famous Sights

The Lower Loop contains many of the places first-time visitors immediately associate with Yellowstone.
Old Faithful and the Upper Geyser Basin sit in the southwest, with Grand Prismatic Spring and the Midway Geyser Basin farther north. The eastern side of the Lower Loop brings you toward Yellowstone Lake, Hayden Valley, and the Grand Canyon of the Yellowstone.
That’s an enormous amount to cover, which is why I don’t recommend treating the Lower Loop as a checklist you need to complete in a single day.
If you have enough time, divide it geographically. One day can focus on Old Faithful and the western geothermal areas, while another combines Canyon, Hayden Valley, and Yellowstone Lake.
Best for: first-time visitors, geothermal features, waterfalls, Yellowstone Lake, and iconic scenery.
Planning takeaway: The Lower Loop contains too much to experience well by simply driving the entire circle and stopping everywhere.
Upper Loop — Mammoth, Tower and Northern Yellowstone

Yellowstone’s Upper Loop covers the northern portion of the Grand Loop Road, connecting areas including Norris, Mammoth Hot Springs, and Tower-Roosevelt.
This part of Yellowstone feels different from the geyser-heavy southwest. You’ll encounter terraces, forests, mountain scenery, wildlife habitat, and access toward the park’s northeast.
Lamar Valley requires an important map distinction: it extends east from the Tower-Roosevelt area toward the Northeast Entrance rather than sitting directly on the Grand Loop itself.
If Lamar wildlife viewing is one of your highest priorities, build it into the itinerary intentionally. Early morning is often a productive time for wildlife viewing, and staying closer to northern or northeastern Yellowstone can make that early start considerably easier.
Best for: Mammoth Hot Springs, northern Yellowstone, scenic driving, and connecting to Lamar Valley.
If wildlife is a major reason for your trip, read my Yellowstone Wildlife Guide and Lamar Valley vs. Hayden Valley guide before building this day.
Key Areas To Know
| Planning Anchor | Why It Matters |
|---|---|
| Old Faithful | Main anchor for southwest geothermal areas |
| Madison | Important west-side road junction |
| Norris | Junction between western Lower and Upper Loop routes |
| Canyon Village | Central connection for Canyon, Hayden and northern routes |
| Fishing Bridge / Lake | Anchor for Yellowstone Lake and east-side routes |
| Mammoth Hot Springs | Northern Yellowstone and North Entrance |
| Tower-Roosevelt | Junction for Lamar Valley and Northeast Entrance |
| Lamar Valley | Major wildlife corridor east of the Grand Loop |
How to Use the Yellowstone Map to Plan Your Days
Understanding Yellowstone’s road system is useful, but the map becomes much more valuable when you use it to decide what belongs together in the same day.
Rather than starting with a list of attractions and trying to connect them afterward, build each day geographically.
Group Nearby Attractions
Start by identifying the Yellowstone attractions you most want to see, then group the ones that naturally fit together.
Old Faithful, the Upper Geyser Basin, and Grand Prismatic Spring make sense together because they’re concentrated in southwestern Yellowstone. Canyon, Hayden Valley, and Yellowstone Lake can work naturally together on another day.
Lamar Valley requires a different approach because it extends east from Tower-Roosevelt toward the Northeast Entrance.
Grouping attractions this way reduces unnecessary backtracking and gives you more time to actually experience each area instead of spending the day crossing the park.
Plan Around Your Highest-Priority Area
Not every Yellowstone trip should use the same map strategy.
If wildlife is your priority, early mornings in Lamar or Hayden Valley may determine how you organize the rest of the day. If geothermal features are the reason you’re visiting, you’ll probably want more time around Old Faithful, Grand Prismatic Spring, and the surrounding geyser basins.
Start with the experiences that matter most to you, then use the map to build the rest of the day around them.
This works much better than trying to visit Yellowstone’s attractions in someone else’s predetermined order.
Choose Lodging After Building the Route
Where you stay can either support your Yellowstone itinerary or create additional driving every morning and evening.
Once you know which part of Yellowstone you’ll explore each day, choose lodging that supports that route rather than simply booking the least expensive room.
Read my Where to Stay in Yellowstone guide for the full strategy, or compare current lodging options on Expedia and Booking.com.
For longer trips, a carefully planned split stay may also reduce backtracking if your itinerary naturally moves from one side of Yellowstone to another.
Leave Room for Delays
A Yellowstone map can show you roads and distances. It can’t predict how long a bison will stand in the road.
Wildlife jams, construction, parking, weather, road conditions, and unexpected stops can all change your schedule.
Build some flexibility into each day instead of scheduling attractions back-to-back based on ideal drive times.
That extra breathing room also gives you the freedom to stop when wildlife appears, spend longer at a favorite viewpoint, or adjust your plans when Yellowstone inevitably throws something unexpected into the day.
Common Yellowstone Map Mistakes
The biggest map mistake is assuming that because two attractions appear relatively close, they belong in the same part of your itinerary.
Another common problem is repeatedly crossing Yellowstone’s major road junctions because attractions were chosen individually rather than geographically.
First-time visitors also tend to underestimate how much time they’ll spend stopping for wildlife, waiting for parking, walking boardwalks, and simply pulling over because the scenery is worth seeing.
Finally, don’t assume you need to complete an entire loop just because Yellowstone’s roads form loops. The map is a planning tool—not a route you have to finish.
My Yellowstone Mistakes to Avoid guide covers the larger itinerary mistakes that often go along with these map problems.
Map and Navigation Tools That Actually Help
Cell service is unreliable throughout much of Yellowstone, so don’t depend entirely on having a live internet connection while you’re driving through the park.
Download offline maps before entering Yellowstone and save the routes or locations you expect to use that day. I also like having a paper map available as a backup because it makes it much easier to see how different areas of the park connect.
My Yellowstone Amazon packing list includes the navigation, wildlife-viewing, layering, and day-trip gear I recommend for the park.
If you prefer seeing the entire park at once rather than navigating on a phone screen, I also recommend carrying a physical Yellowstone map in the car.
Turn the Yellowstone Map Into an Actual Itinerary
Understanding the map is the first step. The next challenge is turning those regions into realistic days without unnecessary backtracking.
My Yellowstone Travel Planning System helps you organize your daily routes, lodging, reservations, budget, packing, and itinerary in one place.
It includes both Printable PDF and Fillable PDF versions, so you can map out your Yellowstone trip on paper or digitally.
Frequently Asked Questions
How is Yellowstone National Park laid out?
Yellowstone’s major developed areas are connected primarily by the Grand Loop Road, which forms a rough figure eight. Other roads extend from that system toward park entrances and areas such as Lamar Valley.
What is the difference between Yellowstone’s Upper and Lower Loops?
The Lower Loop contains many of Yellowstone’s best-known geothermal areas, Yellowstone Lake, Hayden Valley, and the Grand Canyon of the Yellowstone. The Upper Loop connects northern areas including Norris, Mammoth Hot Springs, and Tower-Roosevelt.
Can you drive both Yellowstone loops in one day?
You could physically cover a large amount of Yellowstone in a long day under favorable conditions, but that doesn’t mean it’s a good sightseeing strategy. Most visitors will have a better experience dividing the park geographically and allowing time for attractions, wildlife, parking, and unexpected delays.
Is Lamar Valley on the Upper Loop?
Not exactly. Lamar Valley lies east of the Tower-Roosevelt area along the road toward Yellowstone’s Northeast Entrance. It connects naturally with northern Yellowstone itineraries but isn’t directly on the Grand Loop Road.
Do I need a paper map in Yellowstone?
You don’t absolutely need one, but having offline navigation and a backup map is useful because cell service is limited in many areas of Yellowstone.
Bottom Line
The Yellowstone map becomes much easier to understand once you stop looking at the park as one enormous list of attractions.
The Grand Loop Road provides the basic structure, but you don’t need to drive an entire loop every day. Instead, group nearby attractions, identify the road junctions that connect Yellowstone’s major regions, and build each day around one part of the park.
Use the Lower Loop to understand the geothermal, Canyon, Hayden, and Lake areas. Use the Upper Loop to understand northern Yellowstone and the route toward Lamar Valley. Then choose lodging that supports the route you’ve actually planned.
Think in regions, not checklists.
That’s the Yellowstone map strategy that reduces backtracking and makes the park much easier to experience.